Illustrated guide
Loomworld, your AI editor. What it remembers, you don't have to.
Write: turn an idea into a book
Write is where a story begins. I wanted even a fleeting idea to have somewhere to take root and grow.
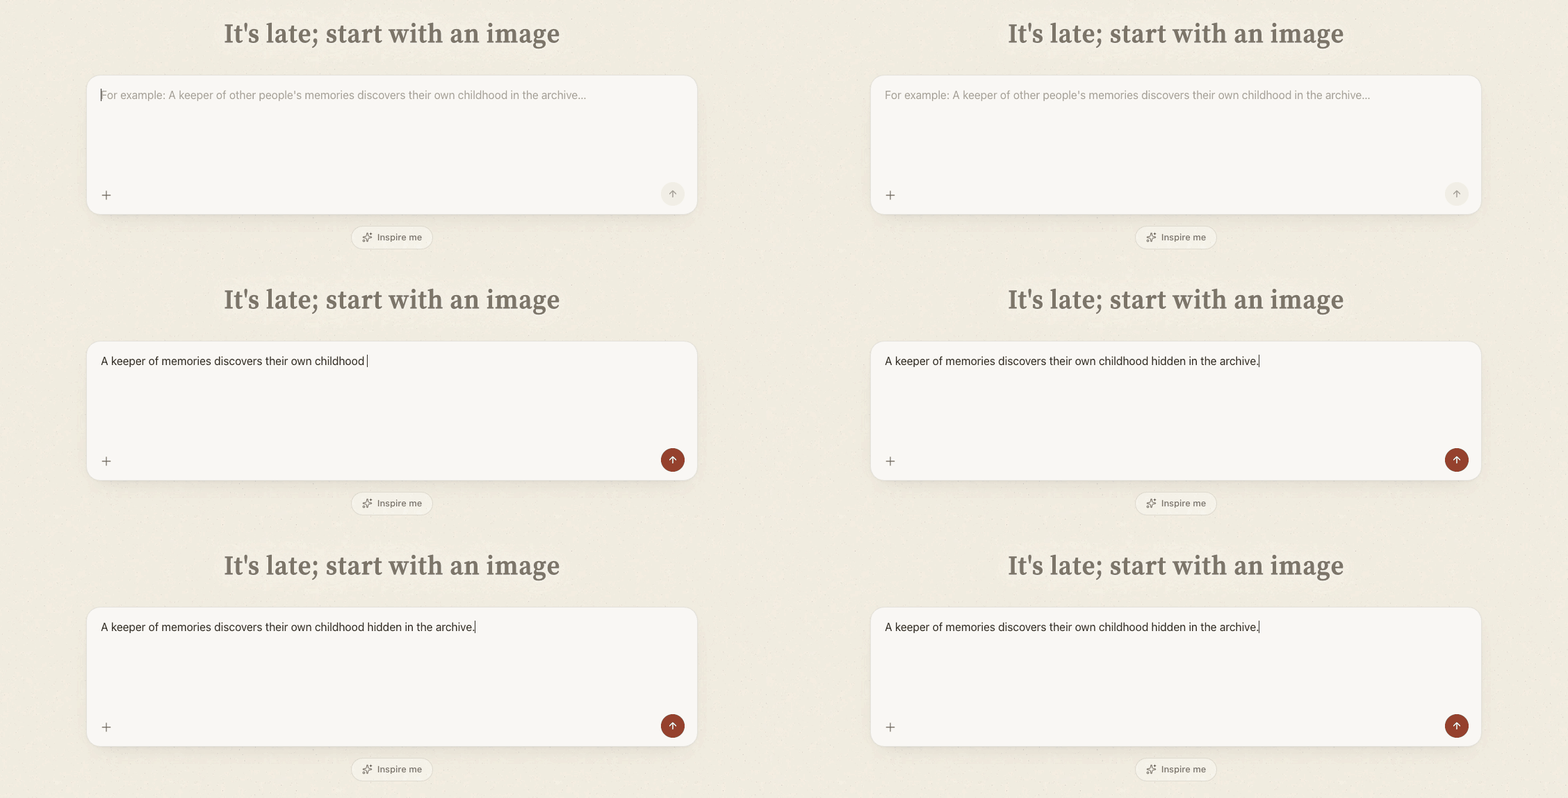
So I replaced the blank-project starting point with a conversation. Type your idea, and Loomworld's assistant, Quill, will help you develop it into a workable proposal.
Once you confirm the proposal, Quill usually creates a basic protagonist card and an opening of around 500 characters, based on your conversation, to make starting easier. No ideas today? Try “Inspire me”: it offers three different story seeds to choose from.
Shelf: a book for every story
Write is where you begin; Shelf is where your stories live.
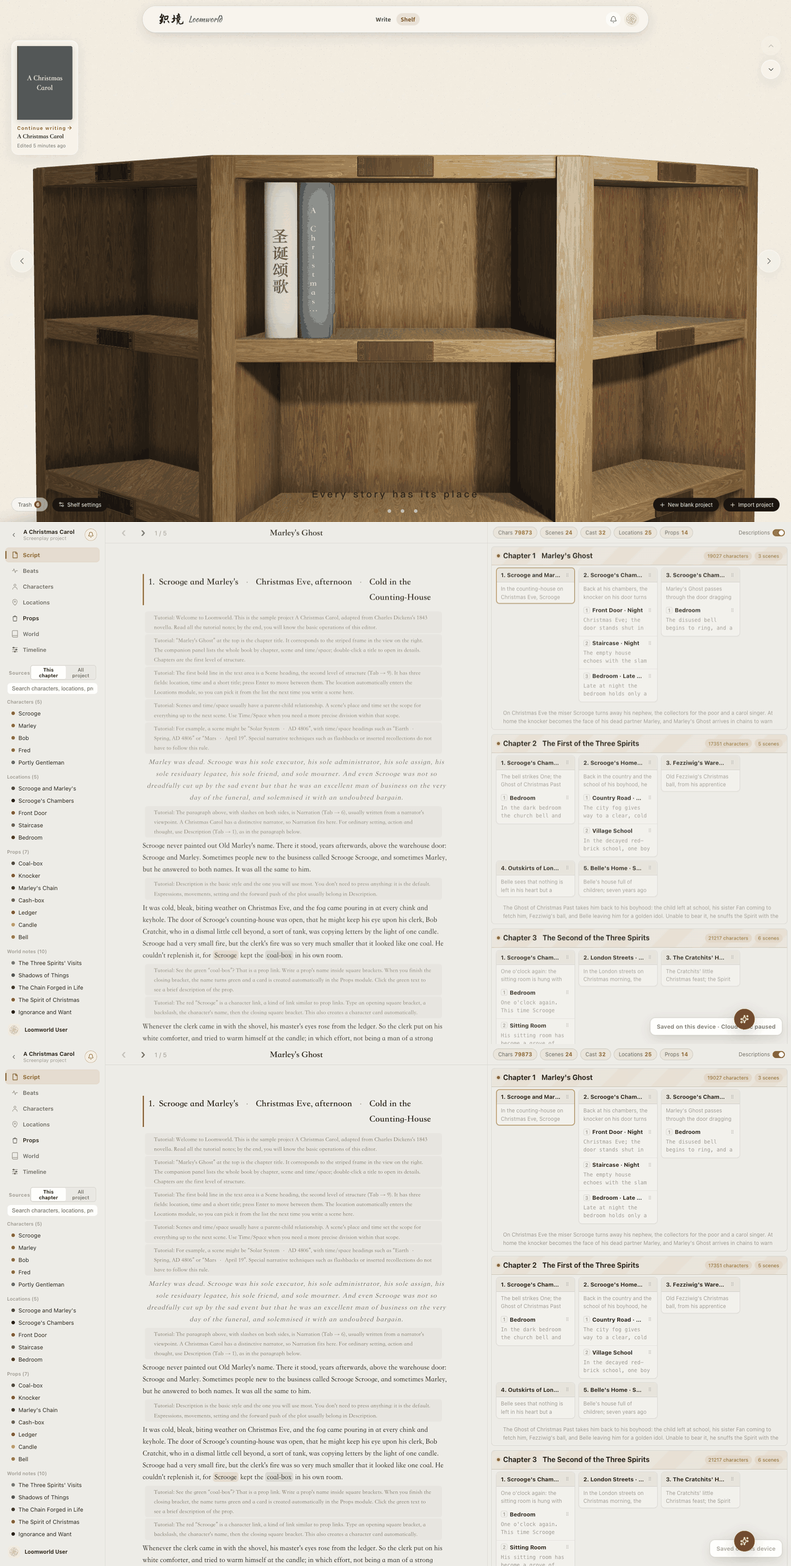
To give writing a sense of occasion, I made it a three-dimensional wooden bookshelf: three tiers, four cells per tier, and eight books per cell. Each cell has a nameplate. In Shelf settings at the bottom right, name the current cell to organize books by genre, and choose a default cell to face whenever you open Shelf.
After registration, your shelf includes A Christmas Carol, a complete sample novel with its reference library. Let's open it.
Script: where you write the draft
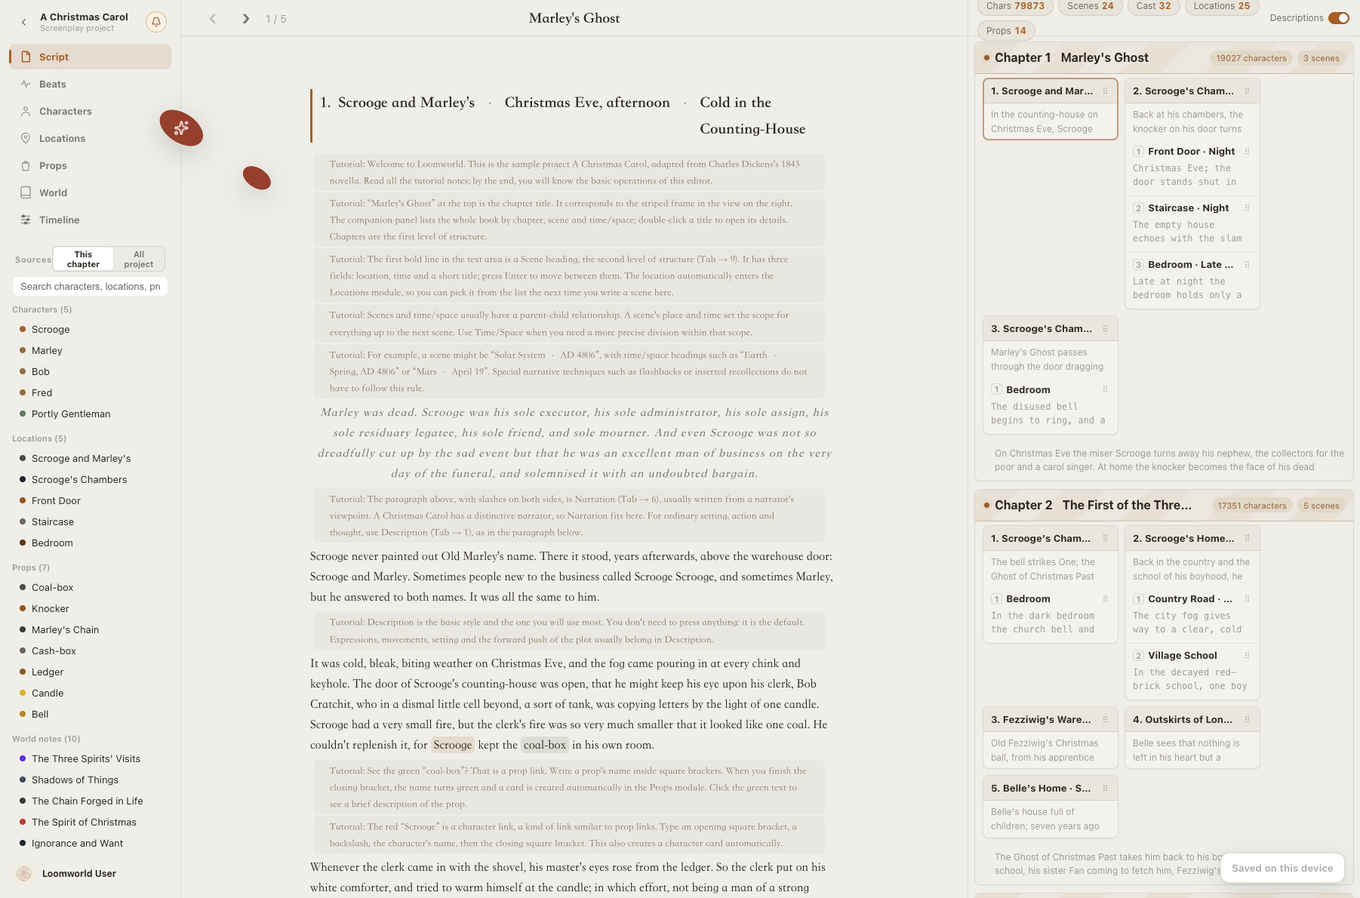
Open a book and you arrive at Script. This is where the draft lives.
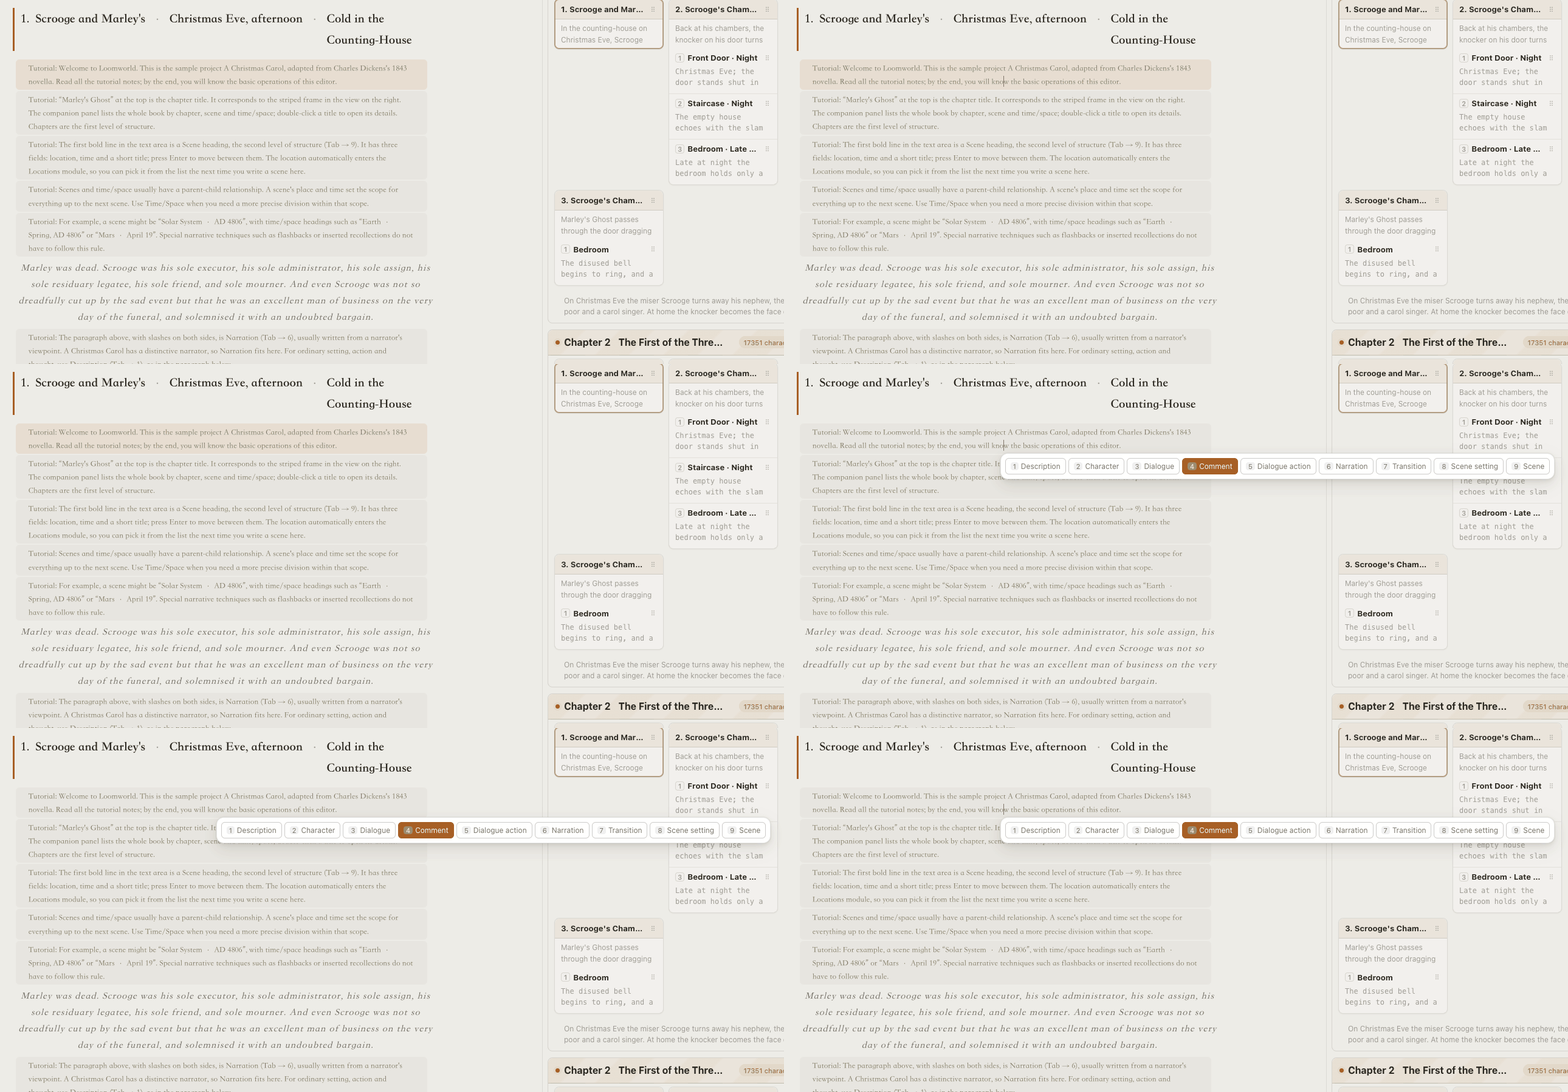
The draft should be more than a plain text box. Each line has its own type, and you can assign it without leaving the keyboard: press Tab, or type / at the start of an empty line. The menu opens at the cursor. Keys 1–9 select Description, Character, Dialogue, Comment, Dialogue action, Narration, Transition, Scene setting (Time/Space), and Scene.
When should you use each type? The sample book's first chapter contains a live example of all nine:
Description (Tab → 1): the default. Just type. Expressions, movement, setting, and plot development all belong here. Most of the first chapter uses Description.
Character (Tab → 2): answers one question: who is speaking? A name's first appearance creates a character record; later uses refer to the same card.
Dialogue (Tab → 3): usually selected automatically. Press Enter after a character name and a Dialogue line appears. For several lines by the same speaker, keep pressing Enter without repeating the name.
Comment (Tab → 4): gray notes, usually for yourself. They are outside the draft and can be excluded from exports. The sample book's “Tutorial” notes use this type.
Dialogue action (Tab → 5): normally an action performed while speaking, between Character and Dialogue: “Without looking up, his quill scratches across the ledger.” Standalone actions can stay in Description.
Narration (Tab → 6): use it for narration, or whenever you want setting, action, or internal thoughts to have a different format from the surrounding prose.
Transition (Tab → 7): a less common, right-aligned format, useful when you have a specific visual transition in mind.
Before Time/Space and Scene, there are three structural levels to understand: Chapter, Scene, and Time/Space. The companion on the right outlines those levels and holds summaries maintained by AI.
Chapter means what you would expect. Scene and Time/Space define a scope in time and place. If a Scene is set in Beijing in 2026, everything under it falls within that scope. A Time/Space entry sits inside its Scene: for example, Beijing in October 2026. It need not narrow both dimensions, but its place and time must stay within the Scene's scope.
This connects events to time and place, so you can follow their order and development. It also gives AI an explicit story structure instead of leaving it to invent missing time references.
Scene setting / Time-Space (Tab → 8): a change of time or place within the same Scene. A location entered here becomes a child of the current Scene's location in the location tree.
Scene (Tab → 9): three fields: location, time, and a short title. Press Tab to move between them. A new location joins the library automatically; use the arrow keys to select an existing one.
The editor's central idea is to remember as you write. Type [prop] to create a prop card and highlight its name in the draft. Click the highlight to open its reference card. Use [\character] for a character card. You can record the important details without taking your hands off the keyboard.
You can also link text to locations and world entries: select the words, right-click, and choose the reference. Keeping these in the menu avoids too many special typing shortcuts.
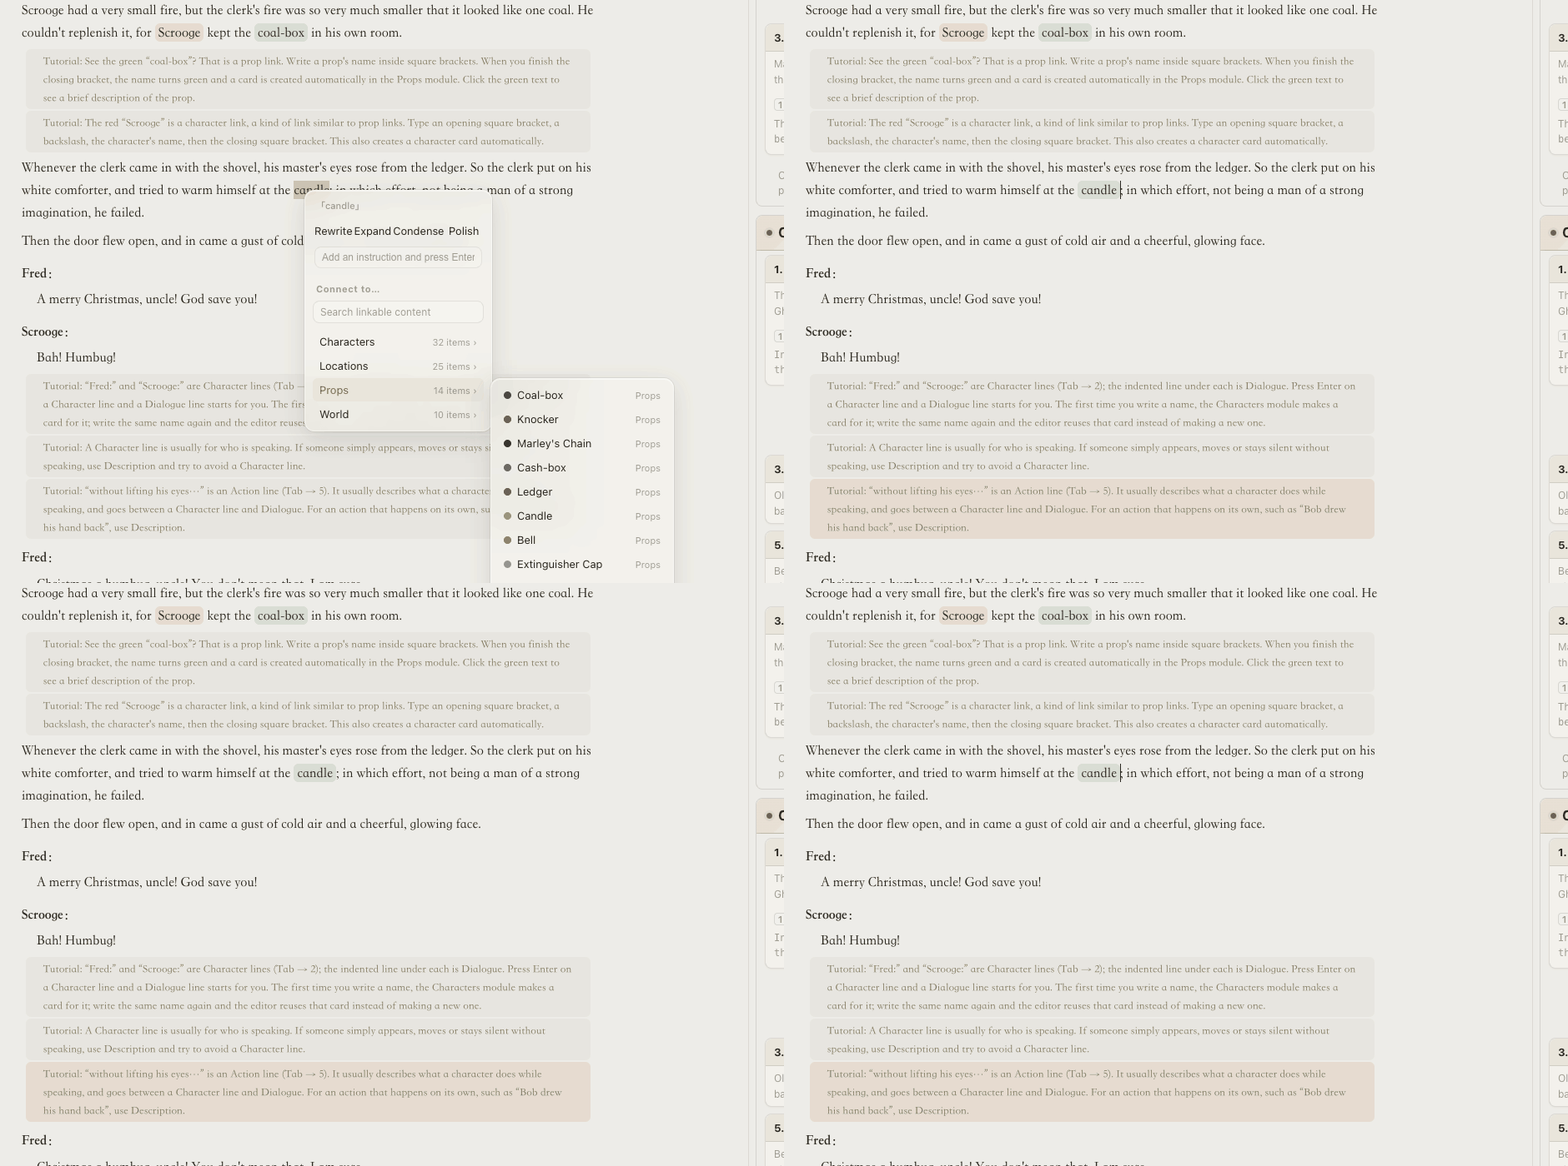
The companion follows your cursor, highlighting the current Scene and showing the chapter’s word count, Scenes, and appearing characters.
Beats: step back and see the whole book
In a long novel, it is easy to lose the bigger picture. Thirty chapters in, you may no longer know which chapters are overloaded, which supporting character has vanished, or which planted clue still needs a payoff.
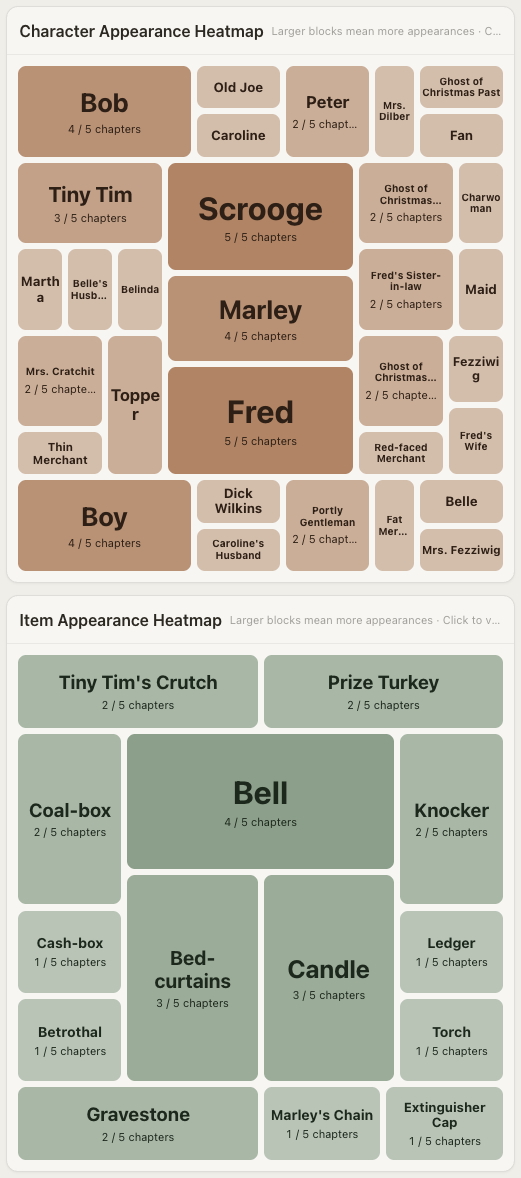
Beats gives you four views: density at the top left, character appearances at the top right, foreshadowing at the bottom left, and prop appearances at the bottom right.
In the two appearance heatmaps, each character or prop occupies a block. A larger block means appearances in more chapters. Hover over a surprisingly small character block to see where that character appears. Props are ordered by narrative weight. A central character who disappears halfway through is easy to spot here.
The density curve combines each chapter's word count, Scenes, characters, and locations. Spikes and dips reveal overloaded chapters and stretches with only one or two Scenes.
The foreshadowing board follows one rule: you record your own clues. AI should not guess what you planted. Enter the setup chapter and intended payoff chapter, and Loomworld calculates the span. Each clue becomes a horizontal bar; those left unresolved for too long are flagged.
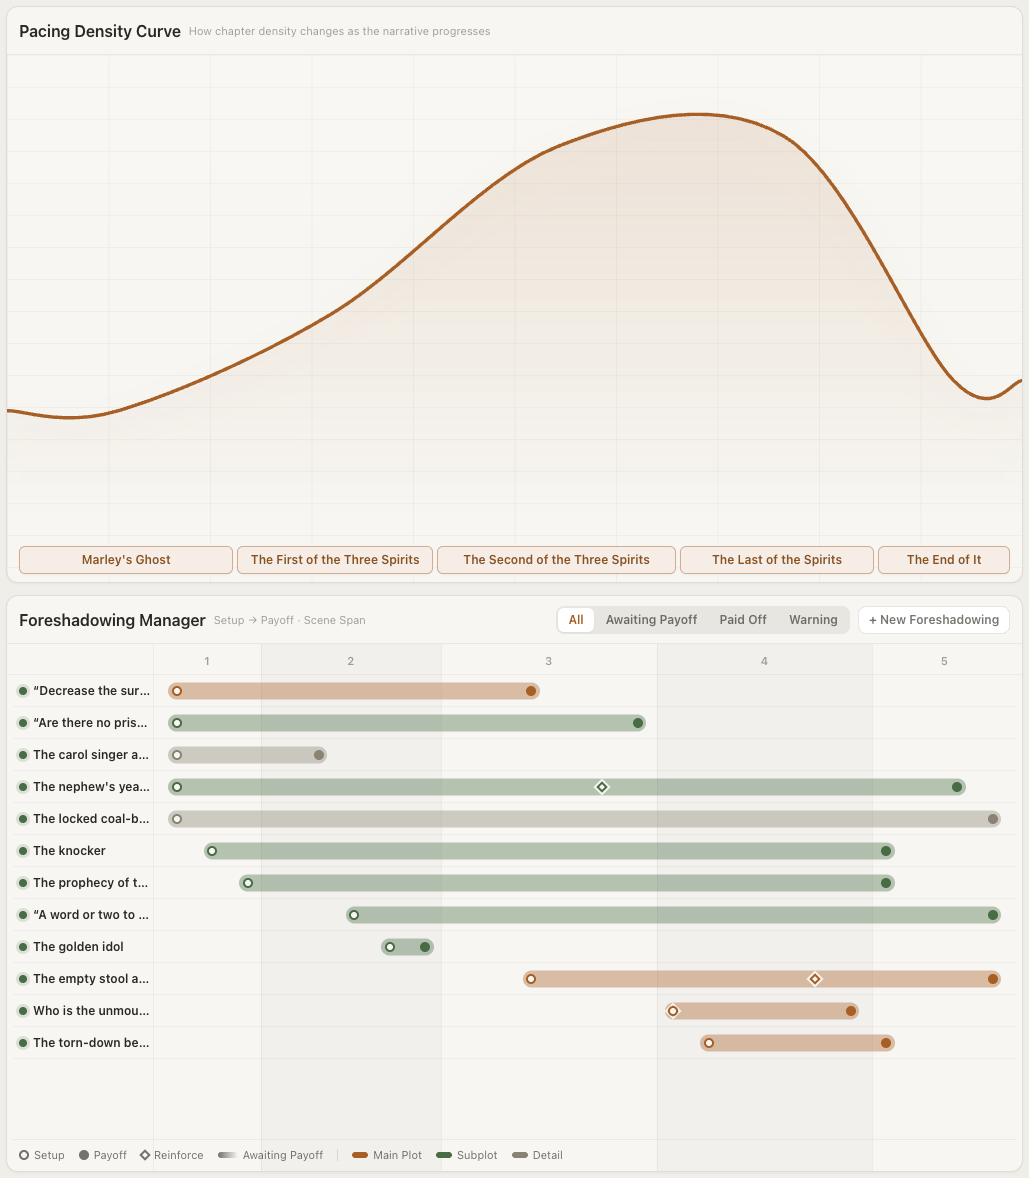
This page lays out the evidence. You still decide where the climax belongs, who should appear, and when the story needs room to breathe.
Characters: relationships are rarely equal
As the cast grows, relationships are often the first thing to get tangled. The Characters page is a relationship canvas. Card sizes reflect five importance levels. Click Auto-Organize to tidy the graph. You can also save a preferred layout and reuse it the next time you organize.
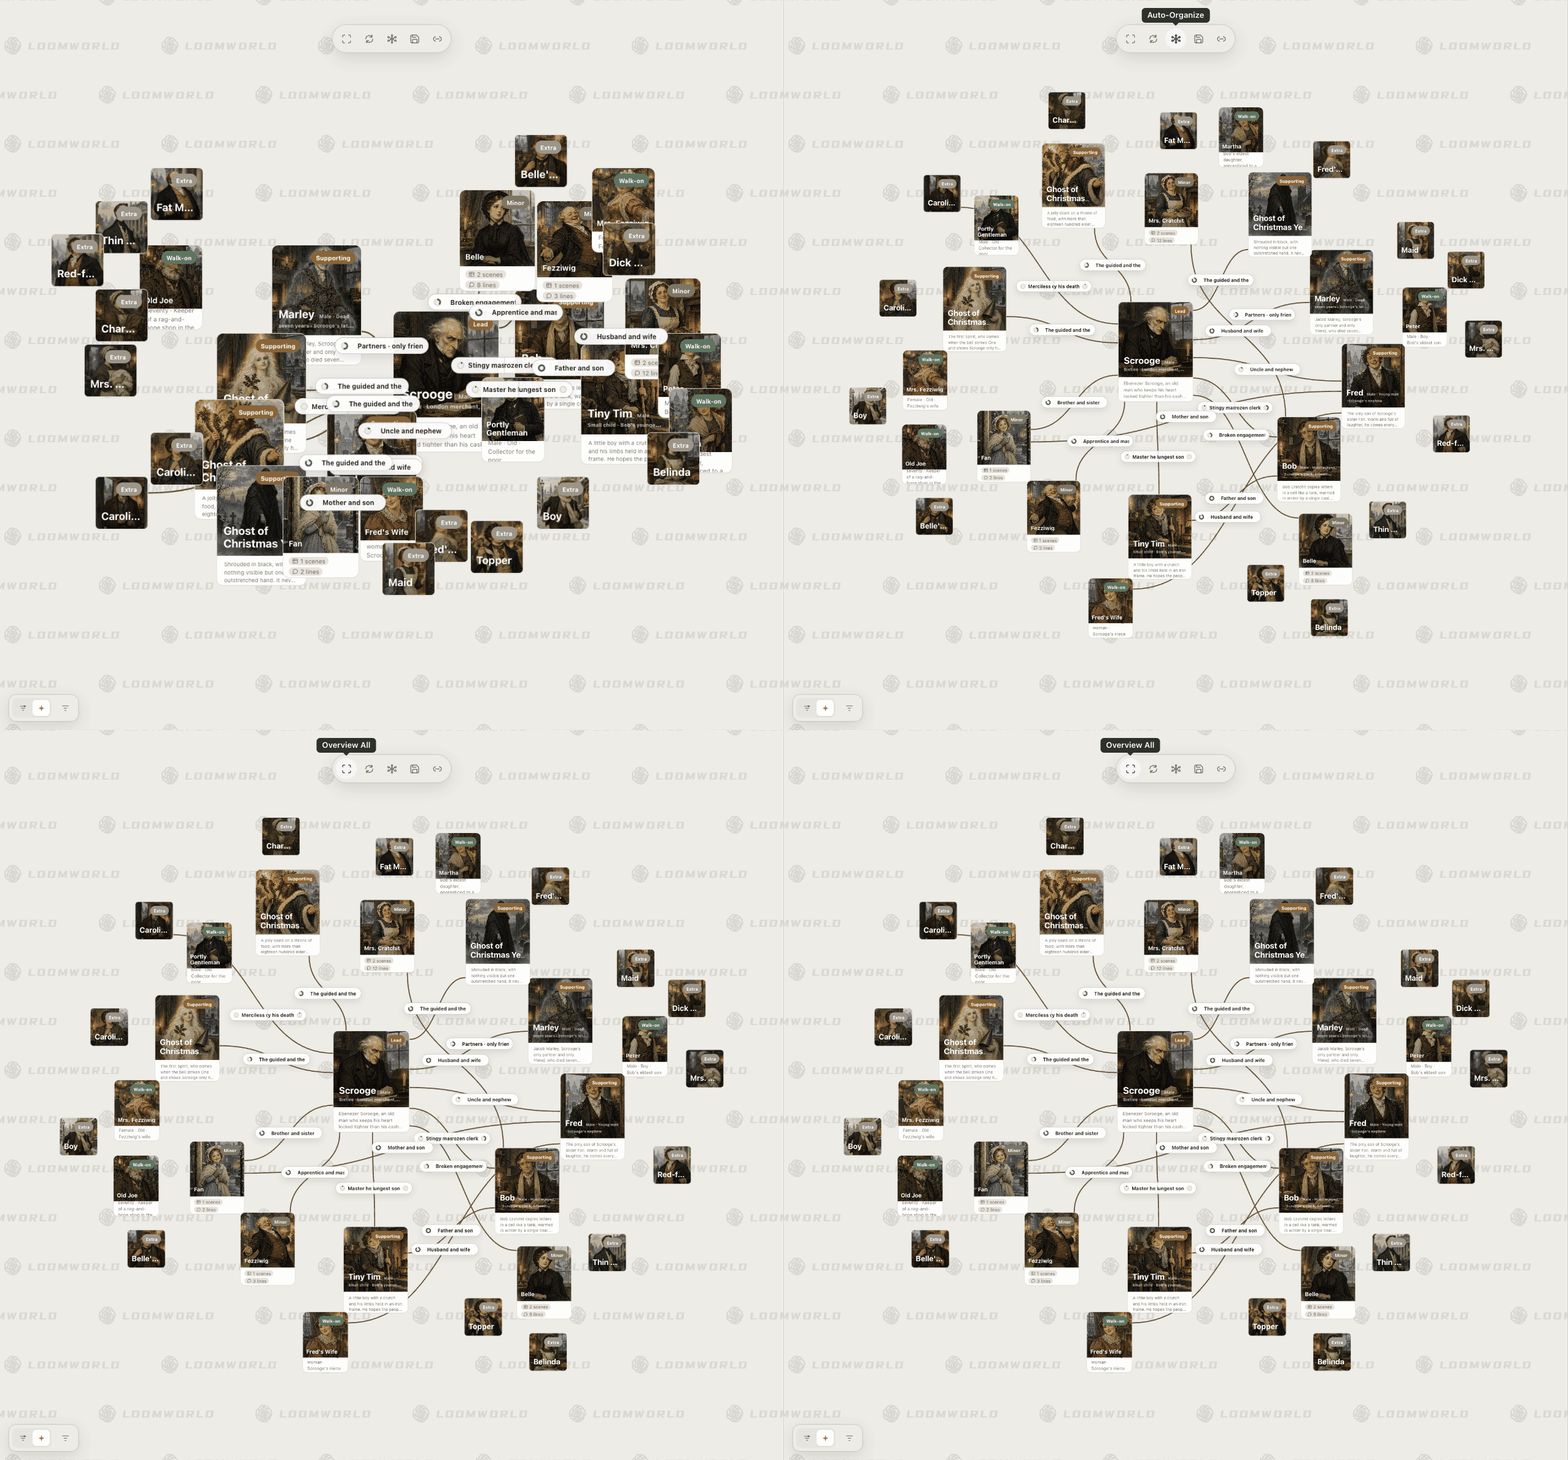
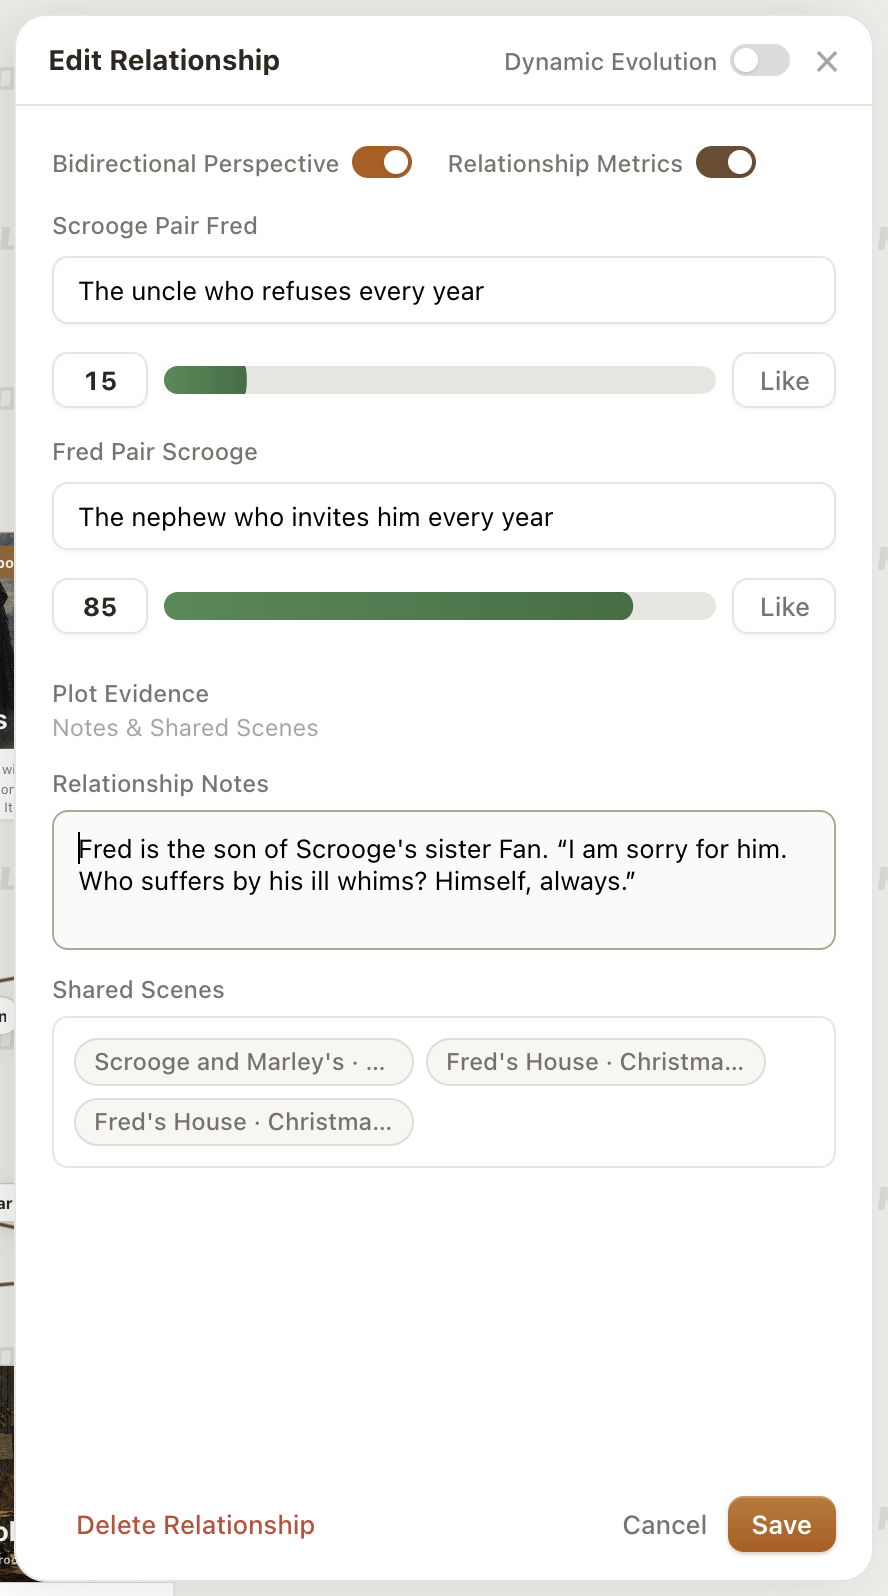
Why make relationships directional? Because feelings rarely match. In A Christmas Carol, Scrooge and Fred are uncle and nephew. Turn on Bidirectional Perspective: Scrooge is the uncle who refuses the invitation every year, with a metric of 15; Fred is the nephew who keeps inviting him, with a metric of 85. One connection, two attitudes.
Relationship Metrics let you name a relationship quality and give it a score from 0–100. For example, name it “Closeness”: 15 can express the uncle's distance and 85 the nephew's warmth. You can use “Trust”, “Hostility”, or any quality your story needs. A higher score means more of the named quality: high Hostility means stronger hostility. You choose both the meaning and the score.
Customize the metric in Edit Relationship. Enable Relationship Metrics, click the name field to the right of the number (initially “Metric”), and enter a name such as “Closeness”. Type a value or drag the slider. With Bidirectional Perspective enabled, A → B and B → A can each have their own name and score; otherwise, they share one set. Click Save. If numbers are unnecessary, switch Relationship Metrics off.
Two things remain yours to decide. Characters appearing in the same Scene get a faint co-appearance line for reference; the system does not declare a relationship. It can suggest a character's importance from appearances, dialogue, and connections, but does not change it for you. Open a card for its portrait, profile, and aliases. Marley can be Jacob Marley, Old Jacob, or Marley's Ghost; all refer to the same record.
Locations: places and the maps you draw for them
Journeys and escapes quickly show why geography needs a map. Locations manages two things: place records and the maps you draw for them.
A location card has a name, environmental description, aliases, and appearances in the draft. Locations form a hierarchy. In the first chapter, “Front Door · Night” places Front Door beneath Scrooge's Home. The list on the right shows that tree.
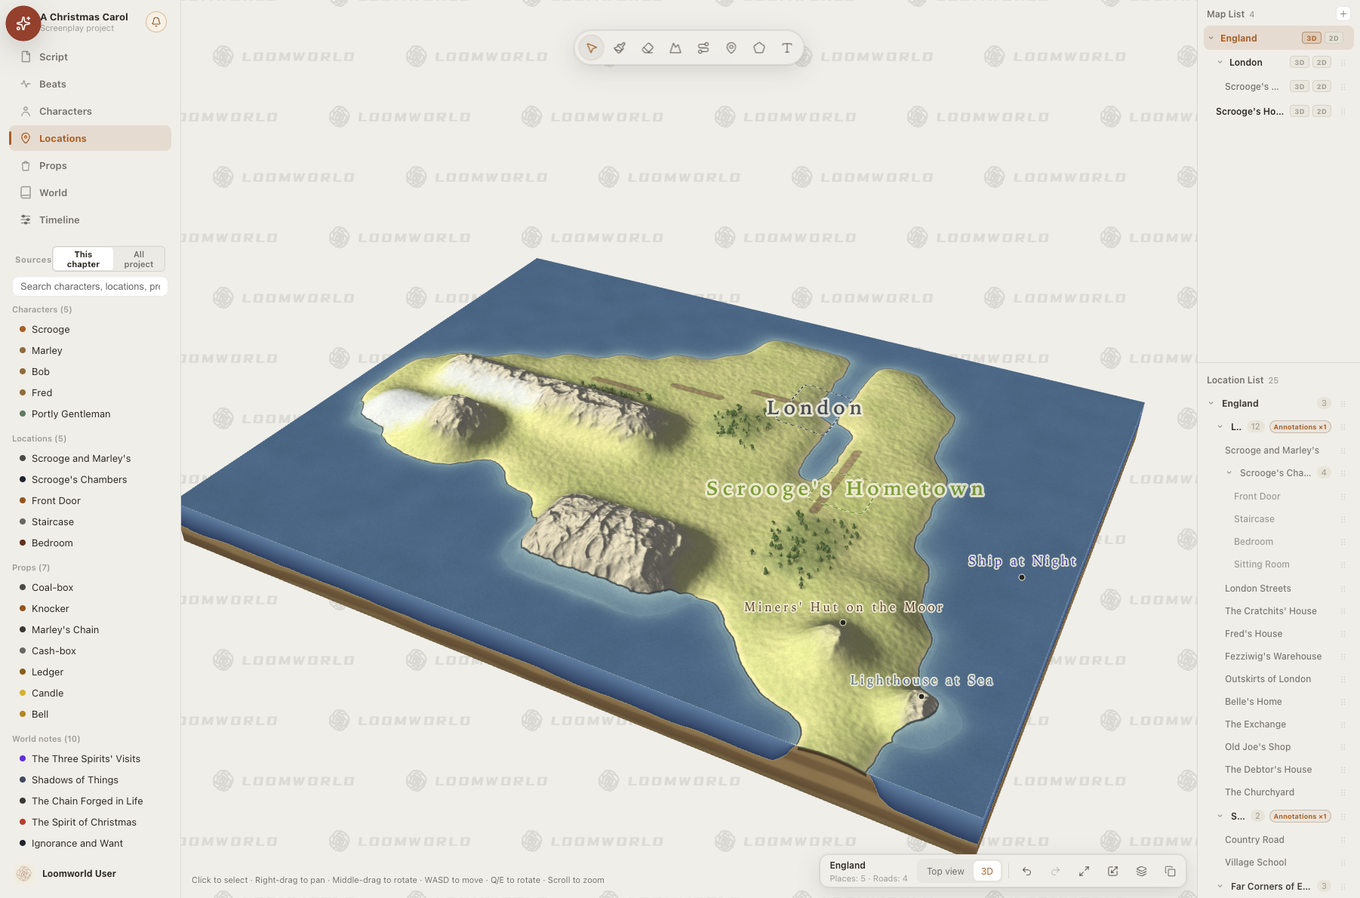
Each project starts with an overview map. Any location can have its own detailed map: double-click it on the overview to go inside. A Christmas Carol has four: England, then London, then Scrooge's Home and His Hometown.
Every map has independent 3D and 2D versions. Switch using 3D or 2D in the right-hand map list. The 3D version has elevation for understanding mountains, cities, and river courses. The 2D pen-and-ink map is suited to the map you might put at the front of a book.
Draw in 3D with the toolbar above the canvas. Terrain offers nine surfaces, including grass, mountains, snow, and water; choose a brush size and paint. Under Elevation, Raise builds hills and Smooth softens edges. Under Paths, drag River downstream from its source; it widens as you draw. Roads work similarly. Right-drag to pan, scroll to zoom, and middle-drag to rotate. London's map was painted this way.
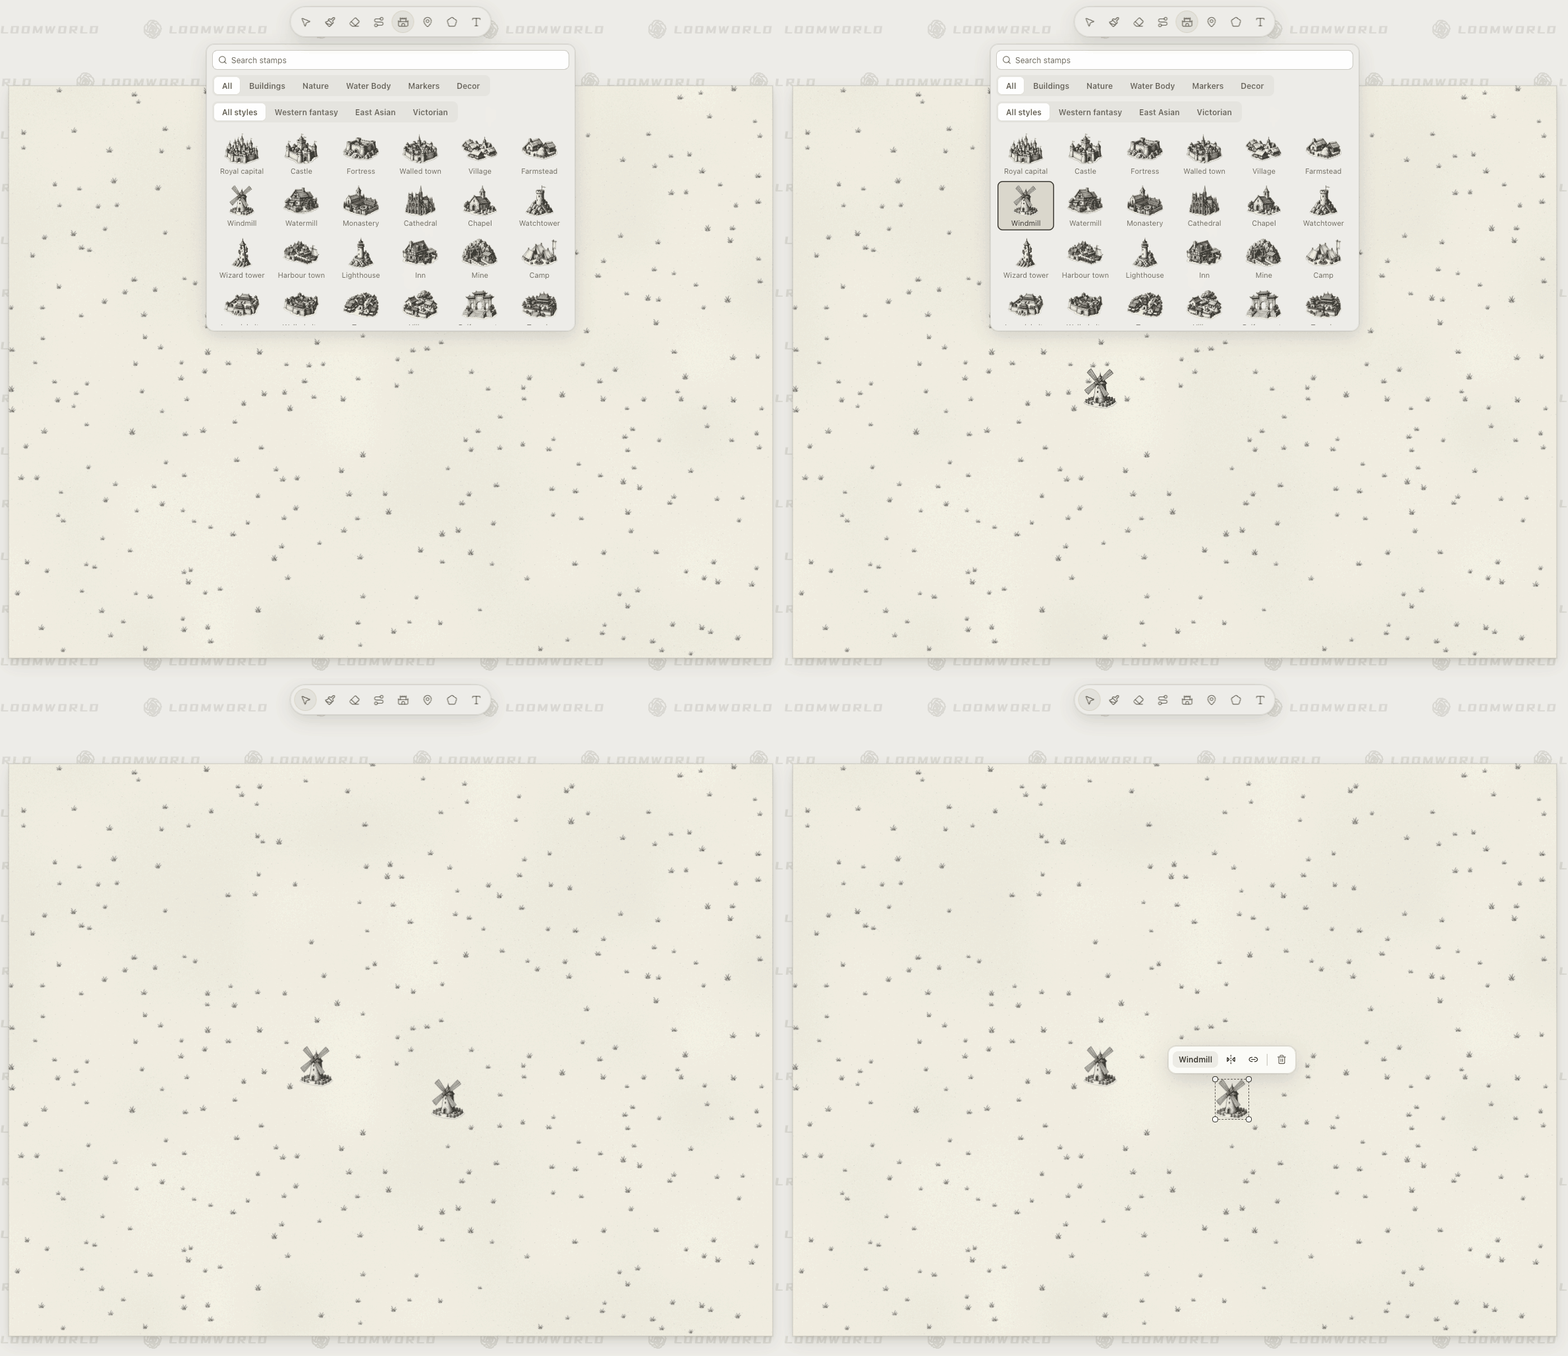
Draw in 2D with similar tools, replacing elevation with Stamps. The library contains 80 stamps, including cities, temples, windmills, and sea creatures. Pick one and click to place it repeatedly. Placed stamps can be moved, resized, and flipped horizontally. You can also upload an existing map as a background and mark locations on it; that is how England's map was made.
Put a location on the map with the Location tool: click for a point, or draw an Area. On release, name a new location or connect the marker to an existing one.
Props: who holds the keepsake now?
Create a prop by typing [knocker] in the draft, as in the first chapter, or click + New Prop on this page and fill in a blank record.
The prop card wall has a count and search field at the top. Each card shows its image and weight. Filter by weight or category, sort by appearances, and hold Cmd/Ctrl to select several cards for bulk weight changes or deletion.
Open a card for the full record. Here are its fields in the order you are likely to need them:
Image: upload one, or ask Quill to draft a prompt first. A generated picture may differ from what you imagined; edit the prompt until it fits before using it.
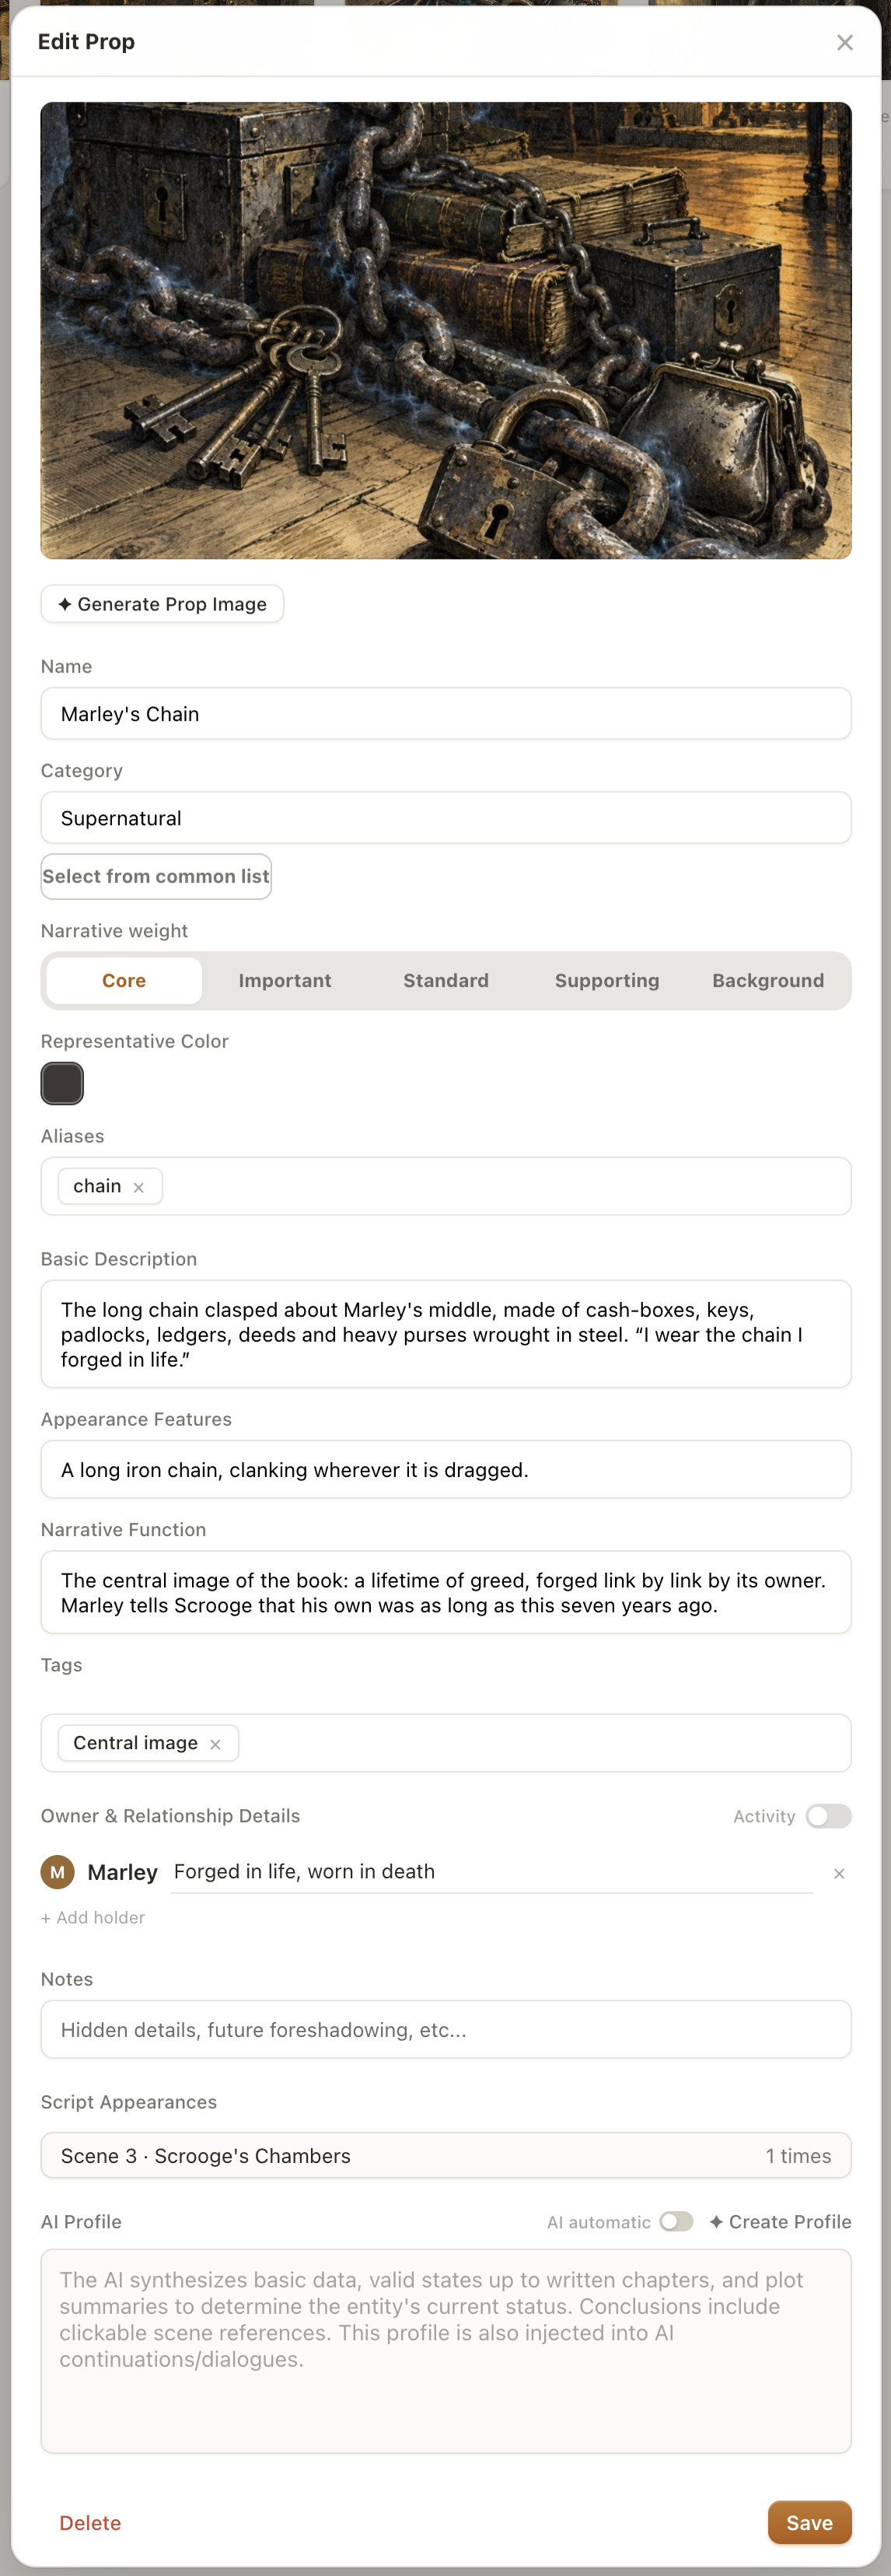
Category: choose a common category, such as personal item, document/token, or tool/weapon, or write your own. A Christmas Carol uses “Supernatural”: Marley's Chain hardly belongs under tools.
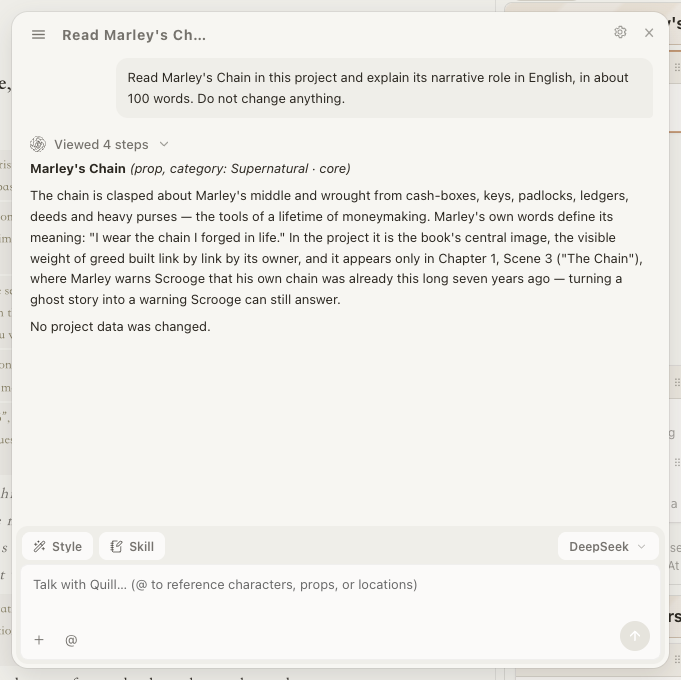
Narrative Weight: five levels: Core, Important, Standard, Supporting, Background. A core prop may drive the plot; a background prop adds atmosphere. The levels help you spend effort where it matters. Marley's Chain is a core prop, with a narrative function: a lifetime of greed, forged one link at a time.
Holders and relationship notes: useful when a token changes hands in a mystery, treasure hunt, or political plot. Click + Add Holder, choose a character, and explain the connection. The Ledger has two holders, Scrooge and Marley, with separate notes. Enable Dynamic for a chapter track, choose a point, and add the next holder. You can then see who held it from which chapter onward.
Script Appearances: every Scene where the prop occurs, listed by Scene number and place, with mention counts. Click to jump to the draft.
World: choose your world's own measures
World stores the rules and terms of your story in five categories: Factions/Organizations, Concepts/Terms, Rules/Systems, History/Events, and Other. Each entry has a name, category, aliases, and description.
The sample's ten entries show what belongs here. Marley's prediction of three spirit visits is a rule; the chain forged in life and Ignorance and Want are concepts; Scrooge and Marley's and the three Christmas Spirits are organizations or factions. Recording the first chapter's promise makes it easier to keep later chapters consistent.
Faction entries also connect to a character's faction field. Rename a faction once and its character tags, roster groups, and leaderboards follow.
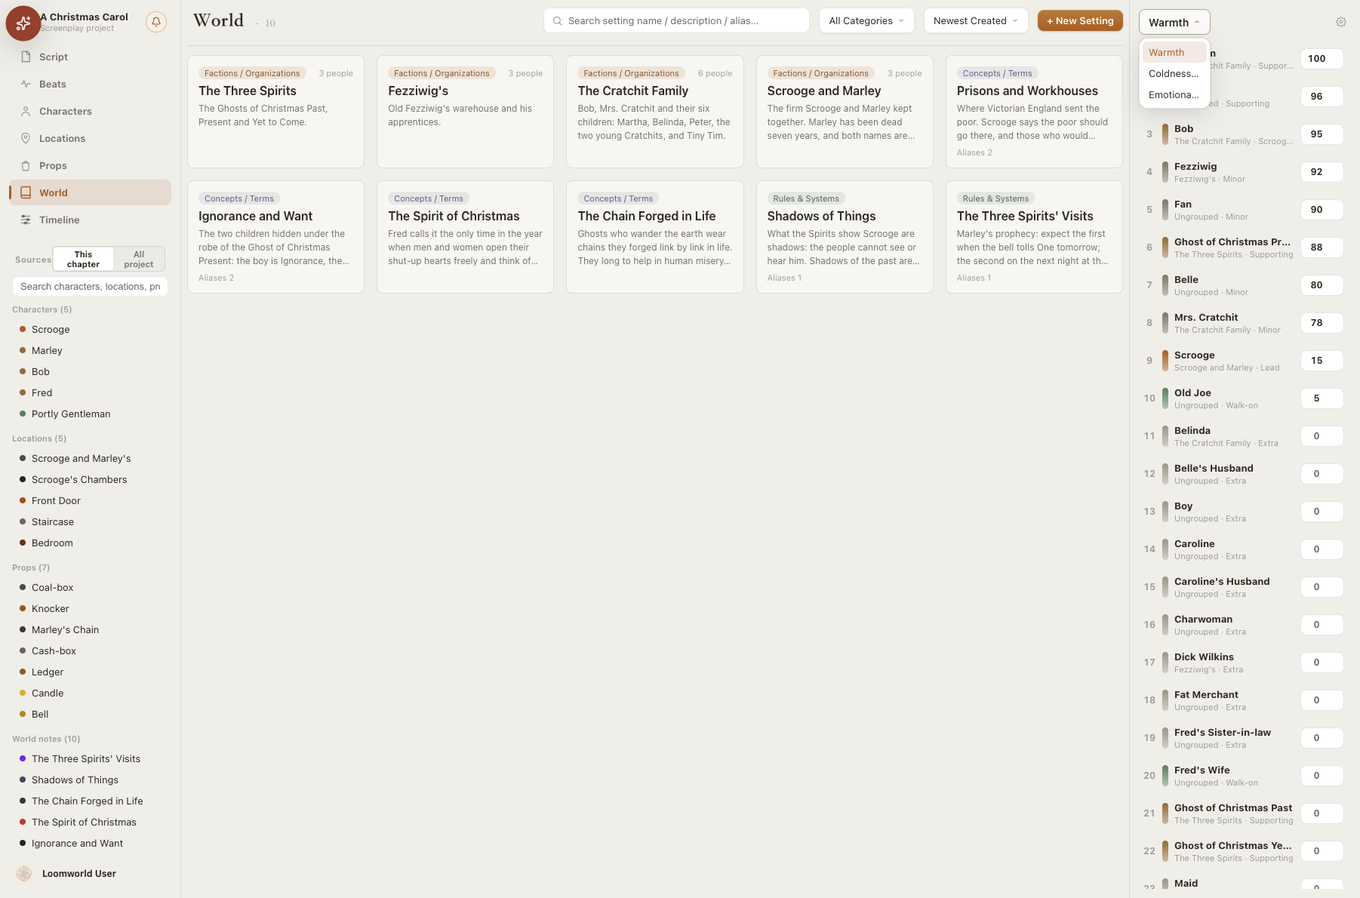
Leaderboards stay on the right. Click Manage Leaderboards → New Leaderboard, name it, choose characters, locations, props, or world entries, and assign scores from 0–999. Higher scores rank first. Character rankings can be limited to one faction. A zero or blank score removes an entry. The sample includes Warmth, with Tiny Tim at 100; Coldness in Chapter 1, led by Scrooge at 100; and Emotional Weight of Props, led by Tiny Tim's Crutch. You choose the measures that fit your world.
Timeline: two clocks for one story
Flashbacks and interwoven scenes can get confusing. Each Timeline event records both its actual story time and its chapter and Scene in the draft. Click to jump there. Reading order and chronological order are different tracks; showing both makes that difference clear.
Start with + Add Storyline, give it a name, and choose a layout.
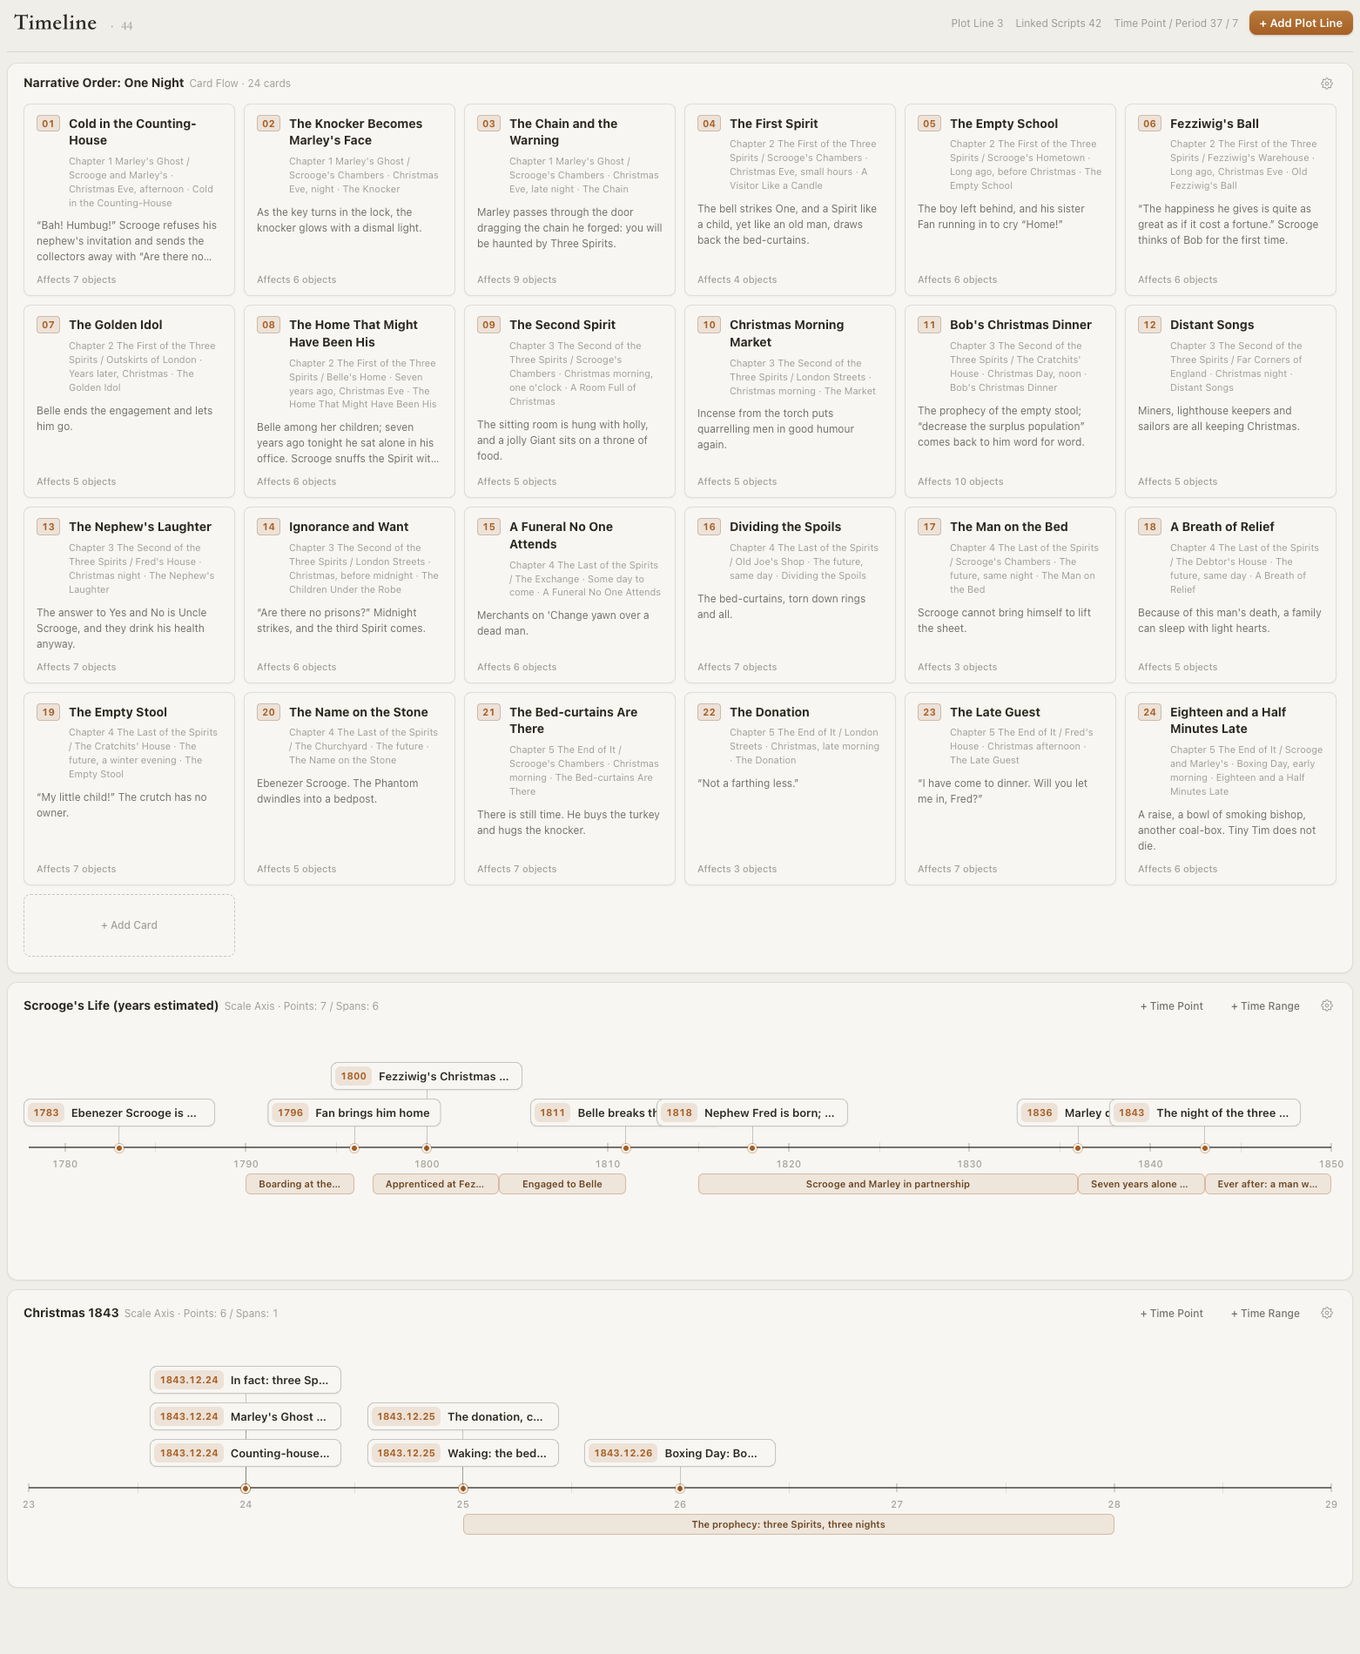
Card Flow: order without dates. Each card is an event; drag to reorder it. Useful for cause and effect or an outline: A happens before B.
Scale Axis: a dated line. Choose numeric, year, year-month, or year-month-day units, with automatic or manual start and end. A Time Point is a named dot above the axis. A Time Span is a bar below it: drag its ends to resize, or move the whole bar. Double-click above to add a point, below to add a span. Scroll to pan; Shift + scroll to zoom.
Double-click any event for the same fields: title, start and optional end time, Occurrence (chapter and Scene, with Jump to Script), a Description supporting @ references, and Affected Objects. Select the characters, locations, props, and world entries involved. These links help Quill trace who or what an event affected when checking continuity.
Custom calendars suit invented worlds. In storyline settings, change the era name, number of months, and month names. Negative years appear as “N years before”.
The sample uses three storylines. Narrative Order: One Night is a 24-card flow from the cold counting-house to the ending, linked to chapters and Scenes. Scrooge's Life is a dated axis from his birth to the conclusion. Christmas 1843 puts Marley's prediction of three spirits over three nights beside their actual arrival in a single night: two separate events on one axis make the trick visible.
Quill: use the details you have saved
Once characters, props, world entries, and timelines are organized, you should not have to search every page while writing. Quill, Loomworld's AI editor, can look them up and discuss what comes next.
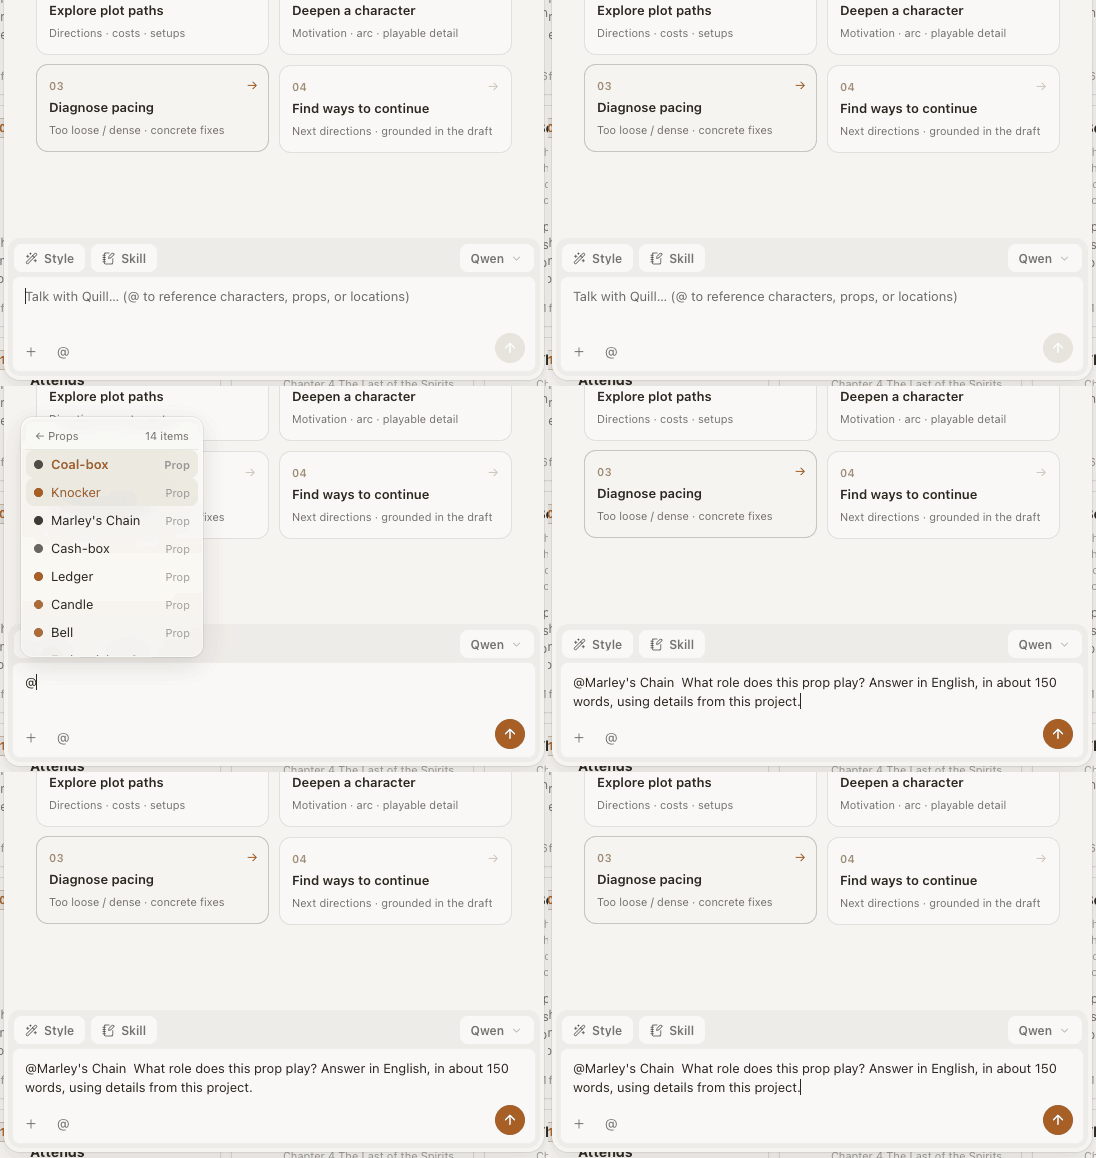
Find earlier details and trace relationships by asking a normal question in Quill: “What role does Marley's Chain play?” or “Explain Scrooge and Fred's relationship using their behavior in the draft.” Quill consults the current project's text and references. To focus on a character, chapter, or Scene, type @ in the input and choose a reference.
Develop ideas together: explain the difficulty, for example, “I want Scrooge's refusal to feel colder without making him a one-note bully. What could show that?” Follow up, disagree, and add constraints until the idea works. The Skills menu also offers starting points for brainstorming, generation, and checks.
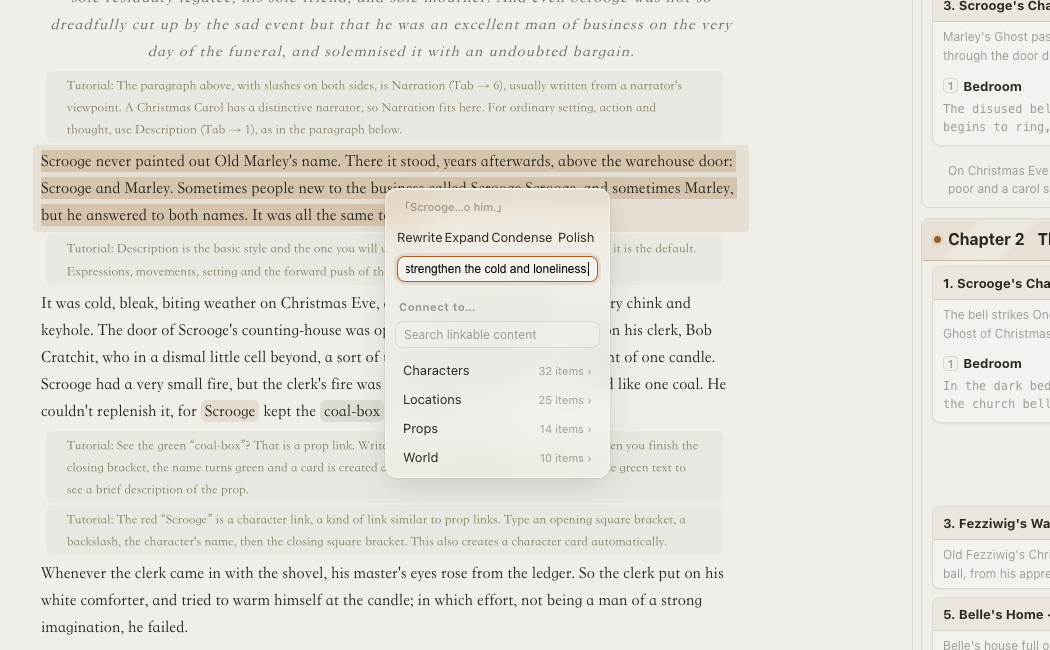
Polish and continue: select existing prose in Script to rewrite, polish, or expand it. For a setting passage, try “Keep the original events; strengthen only the cold and loneliness.” Use Continue Current Chapter to write onward, explaining what should happen and where to stop. Quill uses the draft and relevant references to propose text for you to review and adopt.
Review changes first: if you ask Quill to write the discussion into the draft, revise a relationship, or add a Timeline event, it presents a confirmation card. For example: “Change Scrooge's note about Fred to ‘Refuses aloud, still cares within.’” Review the proposal before confirming. A confirmed change card can also be undone as a whole through project undo. An idea becomes part of the book only when you approve it.
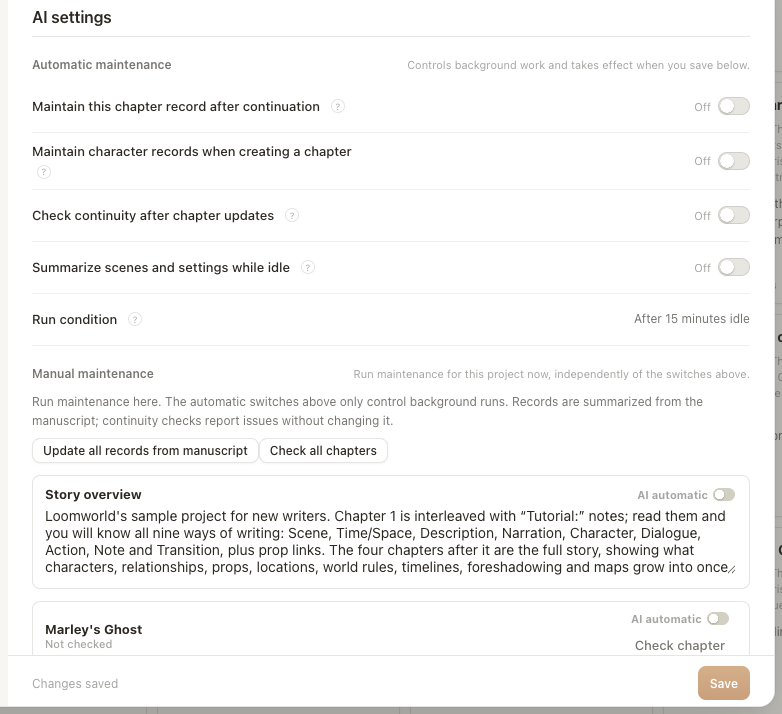
Keep records organized under Settings → Project Settings → AI Settings: chapter summaries, plot overview, character profiles, and continuity checks. Automatic maintenance updates derived records as you write; you can also run updates or checks manually. Suspected inconsistencies are clues for your review. Changes to the draft or author-defined facts still need confirmation.
For real-world research, ask in ordinary chat: “How were London counting-houses heated in 1843? Please give sources.” Use the findings as reference and decide what belongs in the story. Quill can also help draft image prompts for characters and props, then generate an image from the description you approve.
These project AI features require active cloud access and sync the latest version of the current project before running. Paid tasks such as continuation and rewriting use credits; automatic maintenance does not deduct extra credits. You decide where the story goes; Quill saves time on finding details, organizing records, and trying different wording.
Your draft: recover it and take it with you
Writers have two recurring nightmares: ruining a passage with no way back, and losing a draft when switching computers.
The first has two safeguards. Project-wide undo keeps up to 30 steps, including whole Quill changes. After about 90 seconds of inactivity, each Scene also saves a history version, retaining 25 versions per Scene. A Scene rewritten beyond recognition last night can be restored to its earlier version this morning.
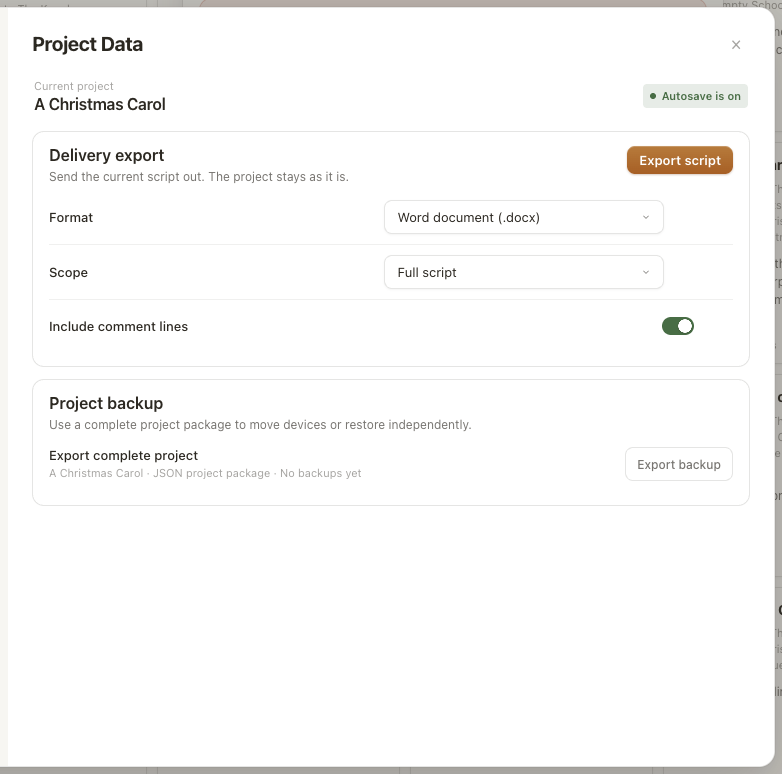
The web app stores drafts in this computer's browser. Clearing site data removes those local copies. Before changing devices, export Word, PDF, or TXT for a chapter or the whole draft, or use Export Full Project to package the book and all its records into one file. Alternatively, enable cloud sync. If two devices edit the same book, conflict handling preserves both versions.
Registration, creating a project in Write and its opening passage, writing, and the library are free. Cloud sync and AI tasks such as continuation use subscriptions and credits. A subscription does not renew automatically when it expires. You can still finish your book without subscribing.
Keep writing
You write; Quill remembers. A Christmas Carol is waiting on your shelf. Open it, follow the examples, then begin a book of your own. Next time, we will explore the Script editor's advanced tools.
A note on the illustrations: every writer deserves an editor. All screens and results shown here come from the real Loomworld interface, using the A Christmas Carol sample project.